Welcome to the LifeTO wiki archive! This is a mirror of the old ggFTW wiki, and much of the content is inaccurate for LifeTO. Please consider checking out the knowledgebase if you're just looking up info about items.

If you're coming from another server, consider giving us a try since you're here anyways :)
 

Bard

From ggFTW Trickster Wiki

Jump to: navigation, search
Image:Power Icon.gif Power Type Image:Magic Icon.gif Magic Type Image:Sense Icon.gif Sense Type Image:Charm Icon.gif Charm Type

Contents

Bard
1st Job 2nd Job 3rd Job
Librarian Bard Soul Master Witch
Librarian Bard Soul Master
Pure
Witch
Hybrid


Information

After the advancement, the Bard is introduced to a variety of elemental spells. A Bard may only combine two of the 5 elements to develop. Possible combinations are displayed on the chart below.
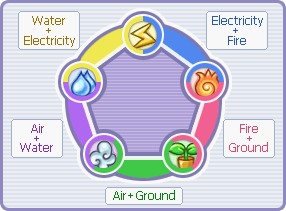

Image:minstrelspell.png

Skills

For more information see Bard Skills, or click one of the below skills for in-depth information.


Bolster Ballad Bolster Ballad Elemental Boost Elemental Boost
Seal of Water Seal of Water Seal of Thunder Seal of Thunder Seal of Fire Seal of Fire Seal of Earth Seal of Earth Seal of Wind Seal of Wind
Drip Bomb Drip Bomb Icey Shackles Icey Shackles Water Web Water Web Water Shield Water Shield Shard of the Glacier Shard of the Glacier
Electro Attack Electro Attack Thunderbolt Thunderbolt Electroshock Electroshock Thunder Shield Thunder Shield Tesla Field Tesla Field
Whirlwind Blaze Whirlwind Blaze Scorching Earth Scorching Earth Incinerate Incinerate Fire Shield Fire Shield Phoenix Rising Phoenix Rising
Cleaving Terra Cleaving Terra Deadly Fen Deadly Fen Summon Boulder Summon Boulder Earth Shield Earth Shield Botulism Cloud Botulism Cloud
Wind Blade Wind Blade Tornado Blast Tornado Blast Whirlwind Whirlwind Wind Shield Wind Shield Razor Gale Razor Gale


Hair Colors

Upon job advancing, all new Bards will start out with a default pink hair color. If you want to change the color, you can purchase a Hair Dye item from MyShop. Once the item is used, your character will always have that color hair in that job, unless changed later. When advancing to the third job however, they will again use the default color unless another Hair Dye item is purchased and used. If you revert back to first job, you will use whichever hair color that job was set at.

Basic Colors
Soft Coloring Soft Coloring 1,400 Points Bard Basic Hair
Professional Colors
Soft Coloring 2 Soft Coloring 2 2,700 Points Bard Professional Hair


Notes: Please note there are different hair dye items for each character and job when purchasing from MyShop.


Advance to 3rd Job

Level Required:

  • Base Level 130. TM Level 120.

Items Required:

Rewards:


Door of Tribulation - Path of Tribulation


Door of Tribulation
Garden of Skill Master
Image:Circle.gif
NPC: Door of Tribulation Location: Garden of Skill Master
Base Experience: None TM Experience: 10,000,000
Request: Ticket of the Valiant, 3x 1 Mil Galder Check
Quest Cycles: 1 Time(s) Condition: Level 130+
Cycle 1: Marble of Triumph
Cycle {{{Cycle_2}}}: {{{Reward_2}}}
Cycle {{{Cycle_3}}}: {{{Reward_3}}}
Cycle {{{Cycle_4}}}: {{{Reward_4}}}
Cycle {{{Cycle_5}}}: {{{Reward_5}}}
Cycle {{{Cycle_6}}}: {{{Reward_6}}}
Cycle {{{Cycle_7}}}: {{{Reward_7}}}
Cycle {{{Cycle_8}}}: {{{Reward_8}}}
Cycle {{{Cycle_9}}}: {{{Reward_9}}}
Cycle {{{Cycle_10}}}: {{{Reward_10}}}
Cycle {{{Cycle_11}}}: {{{Reward_11}}}
Cycle {{{Cycle_12}}}: {{{Reward_12}}}
Cycle {{{Cycle_13}}}: {{{Reward_13}}}
Cycle {{{Cycle_14}}}: {{{Reward_14}}}
Cycle {{{Cycle_15}}}: {{{Reward_15}}}
Cycle {{{Cycle_16}}}: {{{Reward_16}}}
Cycle {{{Cycle_17}}}: {{{Reward_17}}}
Cycle {{{Cycle_18}}}: {{{Reward_18}}}
Cycle {{{Cycle_19}}}: {{{Reward_19}}}
Cycle {{{Cycle_20}}}: {{{Reward_20}}}

Notes: Ticket of the Valiant Ticket of the Valiant is dropped by Clurican (Lv. 240) in 2nd Closed Lot of Jade Steel. 1 Mil Galder Check 1 Mil Galder Check is bought from Andrew in Megalopolis Bank for 1,050,000 Galders.


Next quest you must decide which 3rd job do you want. Go talk to Sacred Esper's Messenger if you become Soul Master (Pure) or go talk to Golden Ant's Messenger if you become Witch (Hybrid).


Sacred Esper's Messenger - Soul Master Quest


Sacred Esper's Messenger
Room of Guardian (Sheep)
Image:Circle.gif
NPC: Sacred Esper's Messenger Location: Room of Guardian (Sheep)
Base Experience: None TM Experience: 16,000,000
Request: Harkon, Needleless Compass, Sealed Guardian
Quest Cycles: 1 Time(s) Condition: Level 130+, TM Level 120+
Cycle 1: Sapphire Guardian, Light Compass
Cycle {{{Cycle_2}}}: {{{Reward_2}}}
Cycle {{{Cycle_3}}}: {{{Reward_3}}}
Cycle {{{Cycle_4}}}: {{{Reward_4}}}
Cycle {{{Cycle_5}}}: {{{Reward_5}}}
Cycle {{{Cycle_6}}}: {{{Reward_6}}}
Cycle {{{Cycle_7}}}: {{{Reward_7}}}
Cycle {{{Cycle_8}}}: {{{Reward_8}}}
Cycle {{{Cycle_9}}}: {{{Reward_9}}}
Cycle {{{Cycle_10}}}: {{{Reward_10}}}
Cycle {{{Cycle_11}}}: {{{Reward_11}}}
Cycle {{{Cycle_12}}}: {{{Reward_12}}}
Cycle {{{Cycle_13}}}: {{{Reward_13}}}
Cycle {{{Cycle_14}}}: {{{Reward_14}}}
Cycle {{{Cycle_15}}}: {{{Reward_15}}}
Cycle {{{Cycle_16}}}: {{{Reward_16}}}
Cycle {{{Cycle_17}}}: {{{Reward_17}}}
Cycle {{{Cycle_18}}}: {{{Reward_18}}}
Cycle {{{Cycle_19}}}: {{{Reward_19}}}
Cycle {{{Cycle_20}}}: {{{Reward_20}}}

Notes: Harkon Harkon is obtained by completing Blacksmith Marx - Find Ingredients for Precious Jewel and Blacksmith Marx - Silent Lava Mine Collection, and is drilled in Techichi Volcano Fields, Tapasco Volcano Fields, Chaos Tower Floors (Battlefields), Gate of Abyss, and Abyss Fields. Needleless Compass Needleless Compass is obtained by completing Bard La Fimmel - Find 16 Guardian Stone for the Needleless Compass. Sealed Guardian Sealed Guardian is obtained by completing Bard La Fimmel - Find Soul Master Guardian Stone. After completion of this quest you become third job. At any time you can revert to your second job look (Bard) by paying 50,000 Galders to Louis Bitton, and 50,000 Galders again to change back to third job look (Soul Master).


Golden Ant's Messenger - Witch Quest


Golden Ant's Messenger
Room of Guardian (Sheep)
Image:Circle.gif
NPC: Golden Ant's Messenger Location: Room of Guardian (Sheep)
Base Experience: None TM Experience: 16,000,000
Request: Harkon, Needleless Compass, Sealed Guardian
Quest Cycles: 1 Time(s) Condition: Level 130+, TM Level 120+
Cycle 1: Amber Guardian, Light Compass
Cycle {{{Cycle_2}}}: {{{Reward_2}}}
Cycle {{{Cycle_3}}}: {{{Reward_3}}}
Cycle {{{Cycle_4}}}: {{{Reward_4}}}
Cycle {{{Cycle_5}}}: {{{Reward_5}}}
Cycle {{{Cycle_6}}}: {{{Reward_6}}}
Cycle {{{Cycle_7}}}: {{{Reward_7}}}
Cycle {{{Cycle_8}}}: {{{Reward_8}}}
Cycle {{{Cycle_9}}}: {{{Reward_9}}}
Cycle {{{Cycle_10}}}: {{{Reward_10}}}
Cycle {{{Cycle_11}}}: {{{Reward_11}}}
Cycle {{{Cycle_12}}}: {{{Reward_12}}}
Cycle {{{Cycle_13}}}: {{{Reward_13}}}
Cycle {{{Cycle_14}}}: {{{Reward_14}}}
Cycle {{{Cycle_15}}}: {{{Reward_15}}}
Cycle {{{Cycle_16}}}: {{{Reward_16}}}
Cycle {{{Cycle_17}}}: {{{Reward_17}}}
Cycle {{{Cycle_18}}}: {{{Reward_18}}}
Cycle {{{Cycle_19}}}: {{{Reward_19}}}
Cycle {{{Cycle_20}}}: {{{Reward_20}}}

Notes: Harkon Harkon is obtained by completing Blacksmith Marx - Find Ingredients for Precious Jewel and Blacksmith Marx - Silent Lava Mine Collection, and is drilled in Techichi Volcano Fields, Tapasco Volcano Fields, Chaos Tower Floors (Battlefields), Gate of Abyss, and Abyss Fields. Needleless Compass Needleless Compass is obtained by completing Bard La Fimmel - Find 16 Guardian Stone for the Needleless Compass. Sealed Guardian Sealed Guardian is obtained by completing Bard La Fimmel - Find Witch Guardian Stone. After completion of this quest you become third job. At any time you can revert to your second job look (Bard) by paying 50,000 Galders to Louis Bitton, and 50,000 Galders again to change back to third job look (Witch).


Bard La Fimmel - Find Soul Master Guardian Stone


Bard La Fimmel
Rose Field 3 - Maze of Blue Rose
Image:Circle.gif
NPC: Bard La Fimmel Location: Rose Field 3 - Maze of Blue Rose
Base Experience: 7,497,300 TM Experience: 7,615,625
Request: Pure Sapphire, Sacred Water
Quest Cycles: 1 Time(s) Condition: Have Sacred Esper's Messenger - Soul Master Quest in quest log, have Marble of Triumph in inventory
Cycle 1: Sealed Guardian, Scroll
Cycle {{{Cycle_2}}}: {{{Reward_2}}}
Cycle {{{Cycle_3}}}: {{{Reward_3}}}
Cycle {{{Cycle_4}}}: {{{Reward_4}}}
Cycle {{{Cycle_5}}}: {{{Reward_5}}}
Cycle {{{Cycle_6}}}: {{{Reward_6}}}
Cycle {{{Cycle_7}}}: {{{Reward_7}}}
Cycle {{{Cycle_8}}}: {{{Reward_8}}}
Cycle {{{Cycle_9}}}: {{{Reward_9}}}
Cycle {{{Cycle_10}}}: {{{Reward_10}}}
Cycle {{{Cycle_11}}}: {{{Reward_11}}}
Cycle {{{Cycle_12}}}: {{{Reward_12}}}
Cycle {{{Cycle_13}}}: {{{Reward_13}}}
Cycle {{{Cycle_14}}}: {{{Reward_14}}}
Cycle {{{Cycle_15}}}: {{{Reward_15}}}
Cycle {{{Cycle_16}}}: {{{Reward_16}}}
Cycle {{{Cycle_17}}}: {{{Reward_17}}}
Cycle {{{Cycle_18}}}: {{{Reward_18}}}
Cycle {{{Cycle_19}}}: {{{Reward_19}}}
Cycle {{{Cycle_20}}}: {{{Reward_20}}}

Notes: Pure Sapphire Pure Sapphire is dropped by Popeyed Anemone (Lv.105). Sacred Water Sacred Water is drilled at Black Swamp Fields.


Bard La Fimmel - Find Witch Guardian Stone


Bard La Fimmel
Rose Field 3 - Maze of Blue Rose
Image:Circle.gif
NPC: Bard La Fimmel Location: Rose Field 3 - Maze of Blue Rose
Base Experience: 7,497,300 TM Experience: 7,615,625
Request: Amber, Sacred Water
Quest Cycles: 1 Time(s) Condition: Have Golden Ant's Messenger - Witch Quest in quest log, have Marble of Triumph in inventory
Cycle 1: Sealed Guardian, Scroll
Cycle {{{Cycle_2}}}: {{{Reward_2}}}
Cycle {{{Cycle_3}}}: {{{Reward_3}}}
Cycle {{{Cycle_4}}}: {{{Reward_4}}}
Cycle {{{Cycle_5}}}: {{{Reward_5}}}
Cycle {{{Cycle_6}}}: {{{Reward_6}}}
Cycle {{{Cycle_7}}}: {{{Reward_7}}}
Cycle {{{Cycle_8}}}: {{{Reward_8}}}
Cycle {{{Cycle_9}}}: {{{Reward_9}}}
Cycle {{{Cycle_10}}}: {{{Reward_10}}}
Cycle {{{Cycle_11}}}: {{{Reward_11}}}
Cycle {{{Cycle_12}}}: {{{Reward_12}}}
Cycle {{{Cycle_13}}}: {{{Reward_13}}}
Cycle {{{Cycle_14}}}: {{{Reward_14}}}
Cycle {{{Cycle_15}}}: {{{Reward_15}}}
Cycle {{{Cycle_16}}}: {{{Reward_16}}}
Cycle {{{Cycle_17}}}: {{{Reward_17}}}
Cycle {{{Cycle_18}}}: {{{Reward_18}}}
Cycle {{{Cycle_19}}}: {{{Reward_19}}}
Cycle {{{Cycle_20}}}: {{{Reward_20}}}

Notes: Amber Amber is dropped by Captain Norman (Lv.148). Sacred Water Sacred Water is drilled at Black Swamp Fields.


Happisto Stallone - Make Happisto's Compass Frame


Happisto Stallone
Gate of Snow Hill
Image:Circle.gif
NPC: Happisto Stallone Location: Gate of Snow Hill
Base Experience: 7,497,300 TM Experience: 7,615,625
Request: Brass, Glass Piece, Magnetite, Magic Powder
Quest Cycles: 3 Time(s) Condition: Have Scroll in inventory
Cycle 1~2: Good Compound Waste, Scroll
Cycle 3: Compass Frame
Cycle {{{Cycle_3}}}: {{{Reward_3}}}
Cycle {{{Cycle_4}}}: {{{Reward_4}}}
Cycle {{{Cycle_5}}}: {{{Reward_5}}}
Cycle {{{Cycle_6}}}: {{{Reward_6}}}
Cycle {{{Cycle_7}}}: {{{Reward_7}}}
Cycle {{{Cycle_8}}}: {{{Reward_8}}}
Cycle {{{Cycle_9}}}: {{{Reward_9}}}
Cycle {{{Cycle_10}}}: {{{Reward_10}}}
Cycle {{{Cycle_11}}}: {{{Reward_11}}}
Cycle {{{Cycle_12}}}: {{{Reward_12}}}
Cycle {{{Cycle_13}}}: {{{Reward_13}}}
Cycle {{{Cycle_14}}}: {{{Reward_14}}}
Cycle {{{Cycle_15}}}: {{{Reward_15}}}
Cycle {{{Cycle_16}}}: {{{Reward_16}}}
Cycle {{{Cycle_17}}}: {{{Reward_17}}}
Cycle {{{Cycle_18}}}: {{{Reward_18}}}
Cycle {{{Cycle_19}}}: {{{Reward_19}}}
Cycle {{{Cycle_20}}}: {{{Reward_20}}}

Notes: Brass Brass is dropped by Brass Knight (Lv.186), Glass Piece Glass Piece is dropped by Bone Warrior (Lv.225), Magnetite Magnetite is dropped by Iron Knight (Lv.184) and Magic Powder Magic Powder is dropped by Bone Magician (Lv.231).


Bard La Fimmel - Room of Ordeal Key - Find Compass Frame


Bard La Fimmel
Rose Field 3 - Maze of Blue Rose
Image:Circle.gif
NPC: Bard La Fimmel Location: Rose Field 3 - Maze of Blue Rose
Base Experience: 1,000 TM Experience: 1,000
Request: Compass Frame
Quest Cycles: 1 Time(s) Condition: Have completed Bard La Fimmel - Find Soul Master Guardian Stone or Bard La Fimmel - Find Witch Guardian Stone
Cycle 1: The Key of Trials
Cycle {{{Cycle_2}}}: {{{Reward_2}}}
Cycle {{{Cycle_3}}}: {{{Reward_3}}}
Cycle {{{Cycle_4}}}: {{{Reward_4}}}
Cycle {{{Cycle_5}}}: {{{Reward_5}}}
Cycle {{{Cycle_6}}}: {{{Reward_6}}}
Cycle {{{Cycle_7}}}: {{{Reward_7}}}
Cycle {{{Cycle_8}}}: {{{Reward_8}}}
Cycle {{{Cycle_9}}}: {{{Reward_9}}}
Cycle {{{Cycle_10}}}: {{{Reward_10}}}
Cycle {{{Cycle_11}}}: {{{Reward_11}}}
Cycle {{{Cycle_12}}}: {{{Reward_12}}}
Cycle {{{Cycle_13}}}: {{{Reward_13}}}
Cycle {{{Cycle_14}}}: {{{Reward_14}}}
Cycle {{{Cycle_15}}}: {{{Reward_15}}}
Cycle {{{Cycle_16}}}: {{{Reward_16}}}
Cycle {{{Cycle_17}}}: {{{Reward_17}}}
Cycle {{{Cycle_18}}}: {{{Reward_18}}}
Cycle {{{Cycle_19}}}: {{{Reward_19}}}
Cycle {{{Cycle_20}}}: {{{Reward_20}}}


Bard La Fimmel - Find 16 Guardian Stones for the Needleless Compass


Bard La Fimmel
Rose Field 3 - Maze of Blue Rose
Image:Circle.gif
NPC: Bard La Fimmel Location: Rose Field 3 - Maze of Blue Rose
Base Experience: 1,000 TM Experience: 1,000
Request: Marble of Triumph, Stone of Patience
Quest Cycles: 1 Time(s) Condition: Have completed Happisto Stallone - Make Happisto's Compass Frame, have The Key of Trials
Cycle 1: Needleless Compass
Cycle {{{Cycle_2}}}: {{{Reward_2}}}
Cycle {{{Cycle_3}}}: {{{Reward_3}}}
Cycle {{{Cycle_4}}}: {{{Reward_4}}}
Cycle {{{Cycle_5}}}: {{{Reward_5}}}
Cycle {{{Cycle_6}}}: {{{Reward_6}}}
Cycle {{{Cycle_7}}}: {{{Reward_7}}}
Cycle {{{Cycle_8}}}: {{{Reward_8}}}
Cycle {{{Cycle_9}}}: {{{Reward_9}}}
Cycle {{{Cycle_10}}}: {{{Reward_10}}}
Cycle {{{Cycle_11}}}: {{{Reward_11}}}
Cycle {{{Cycle_12}}}: {{{Reward_12}}}
Cycle {{{Cycle_13}}}: {{{Reward_13}}}
Cycle {{{Cycle_14}}}: {{{Reward_14}}}
Cycle {{{Cycle_15}}}: {{{Reward_15}}}
Cycle {{{Cycle_16}}}: {{{Reward_16}}}
Cycle {{{Cycle_17}}}: {{{Reward_17}}}
Cycle {{{Cycle_18}}}: {{{Reward_18}}}
Cycle {{{Cycle_19}}}: {{{Reward_19}}}
Cycle {{{Cycle_20}}}: {{{Reward_20}}}


Vulcanus Phoenix's Messenger - Hunt Tribunal Flame Moth


Vulcanus Phoenix's Messenger
Room of Tribulation 1
Image:Circle.gif
NPC: Vulcanus Phoenix's Messenger Location: Room of Tribulation 1
Quest Cycles: Each 1 Time(s) Condition: Have Boxer Jeanne, Warrior Kei, Bard La Fimmel, Magician Louie, Explorer Reina, Inventor Gale, Entertainer Elicia, or Card Master Taniel - Find 16 Guardian Stones for the Needleless Compass in quest log
Level Request Reward Base / TM
130+ 3x Tribunal Flame Moth (Lv.150) in 5 min Flower of Revival 749,730 / 761,562
{{{Level_2}}} {{{Qt_2}}}x [[{{{Monster_2}}}]] (Lv.{{{LvM_2}}}) in {{{Time_2}}} {{{Reward_2}}} {{{Exp_2}}}
{{{Level_3}}} {{{Qt_3}}}x [[{{{Monster_3}}}]] (Lv.{{{LvM_3}}}) in {{{Time_3}}} {{{Reward_3}}} {{{Exp_3}}}
{{{Level_4}}} {{{Qt_4}}}x [[{{{Monster_4}}}]] (Lv.{{{LvM_4}}}) in {{{Time_4}}} {{{Reward_4}}} {{{Exp_4}}}
{{{Level_5}}} {{{Qt_5}}}x [[{{{Monster_5}}}]] (Lv.{{{LvM_5}}}) in {{{Time_5}}} {{{Reward_5}}} {{{Exp_5}}}
Found at:
Tribunal Flame Moth is found at Room of Tribulation 1 (battlefield).
Tribunal Flame Moth

Notes: {{{Notes}}}


Alsiedo Bird's Messenger - Hunt Tribunal Siremaid


Alsiedo Bird's Messenger
Room of Tribulation 2
Image:Circle.gif
NPC: Alsiedo Bird's Messenger Location: Room of Tribulation 2
Quest Cycles: Each 1 Time(s) Condition: Have completed Vulcanus Phoenix's Messenger - Hunt Tribunal Flame Moth
Level Request Reward Base / TM
130+ 3x Tribunal Siremaid (Lv.150) in 5 min None 749,730 / 761,562
{{{Level_2}}} {{{Qt_2}}}x [[{{{Monster_2}}}]] (Lv.{{{LvM_2}}}) in {{{Time_2}}} {{{Reward_2}}} {{{Exp_2}}}
{{{Level_3}}} {{{Qt_3}}}x [[{{{Monster_3}}}]] (Lv.{{{LvM_3}}}) in {{{Time_3}}} {{{Reward_3}}} {{{Exp_3}}}
{{{Level_4}}} {{{Qt_4}}}x [[{{{Monster_4}}}]] (Lv.{{{LvM_4}}}) in {{{Time_4}}} {{{Reward_4}}} {{{Exp_4}}}
{{{Level_5}}} {{{Qt_5}}}x [[{{{Monster_5}}}]] (Lv.{{{LvM_5}}}) in {{{Time_5}}} {{{Reward_5}}} {{{Exp_5}}}
Found at:
Tribunal Siremaid is found at Room of Tribulation 2 (battlefield).
Tribunal Siremaid

Notes: {{{Notes}}}


Dragon Tale's Messenger - Hunt Tribunal Crow


Dragon Tale's Messenger
Room of Tribulation 3
Image:Circle.gif
NPC: Dragon Tale's Messenger Location: Room of Tribulation 3
Quest Cycles: Each 1 Time(s) Condition: Have completed Alsiedo Bird's Messenger - Hunt Tribunal Siremaid
Level Request Reward Base / TM
130+ 3x Tribunal Crow (Lv.150) in 5 min None 749,730 / 761,562
{{{Level_2}}} {{{Qt_2}}}x [[{{{Monster_2}}}]] (Lv.{{{LvM_2}}}) in {{{Time_2}}} {{{Reward_2}}} {{{Exp_2}}}
{{{Level_3}}} {{{Qt_3}}}x [[{{{Monster_3}}}]] (Lv.{{{LvM_3}}}) in {{{Time_3}}} {{{Reward_3}}} {{{Exp_3}}}
{{{Level_4}}} {{{Qt_4}}}x [[{{{Monster_4}}}]] (Lv.{{{LvM_4}}}) in {{{Time_4}}} {{{Reward_4}}} {{{Exp_4}}}
{{{Level_5}}} {{{Qt_5}}}x [[{{{Monster_5}}}]] (Lv.{{{LvM_5}}}) in {{{Time_5}}} {{{Reward_5}}} {{{Exp_5}}}
Found at:
Tribunal Crow is found at Room of Tribulation 3 (battlefield).
Tribunal Crow

Notes: {{{Notes}}}


Black Wings' Messenger - Hunt Tribunal Seth


Black Wings' Messenger
Room of Tribulation 4
Image:Circle.gif
NPC: Black Wings' Messenger Location: Room of Tribulation 4
Quest Cycles: Each 1 Time(s) Condition: Have completed Dragon Tale's Messenger - Hunt Tribunal Crow
Level Request Reward Base / TM
130+ 3x Tribunal Seth (Lv.150) in 5 min None 749,730 / 761,562
{{{Level_2}}} {{{Qt_2}}}x [[{{{Monster_2}}}]] (Lv.{{{LvM_2}}}) in {{{Time_2}}} {{{Reward_2}}} {{{Exp_2}}}
{{{Level_3}}} {{{Qt_3}}}x [[{{{Monster_3}}}]] (Lv.{{{LvM_3}}}) in {{{Time_3}}} {{{Reward_3}}} {{{Exp_3}}}
{{{Level_4}}} {{{Qt_4}}}x [[{{{Monster_4}}}]] (Lv.{{{LvM_4}}}) in {{{Time_4}}} {{{Reward_4}}} {{{Exp_4}}}
{{{Level_5}}} {{{Qt_5}}}x [[{{{Monster_5}}}]] (Lv.{{{LvM_5}}}) in {{{Time_5}}} {{{Reward_5}}} {{{Exp_5}}}
Found at:
Tribunal Seth is found at Room of Tribulation 4 (battlefield).
Tribunal Seth

Notes: {{{Notes}}}


Sacred Esper's Messenger - Hunt Tribunal Shadow


Sacred Esper's Messenger
Room of Tribulation 5
Image:Circle.gif
NPC: Sacred Esper's Messenger Location: Room of Tribulation 5
Quest Cycles: Each 1 Time(s) Condition: Have completed Black Wings' Messenger - Hunt Tribunal Seth
Level Request Reward Base / TM
130+ 3x Tribunal Shadow (Lv.160) in 5 min None 749,730 / 761,562
{{{Level_2}}} {{{Qt_2}}}x [[{{{Monster_2}}}]] (Lv.{{{LvM_2}}}) in {{{Time_2}}} {{{Reward_2}}} {{{Exp_2}}}
{{{Level_3}}} {{{Qt_3}}}x [[{{{Monster_3}}}]] (Lv.{{{LvM_3}}}) in {{{Time_3}}} {{{Reward_3}}} {{{Exp_3}}}
{{{Level_4}}} {{{Qt_4}}}x [[{{{Monster_4}}}]] (Lv.{{{LvM_4}}}) in {{{Time_4}}} {{{Reward_4}}} {{{Exp_4}}}
{{{Level_5}}} {{{Qt_5}}}x [[{{{Monster_5}}}]] (Lv.{{{LvM_5}}}) in {{{Time_5}}} {{{Reward_5}}} {{{Exp_5}}}
Found at:
Tribunal Shadow is found at Room of Tribulation 5 (battlefield).
Tribunal Shadow

Notes: {{{Notes}}}


Golden Ant's Messenger - Hunt Tribunal Tooth Flower


Golden Ant's Messenger
Room of Tribulation 6
Image:Circle.gif
NPC: Golden Ant's Messenger Location: Room of Tribulation 6
Quest Cycles: Each 1 Time(s) Condition: Have completed Sacred Esper's Messenger - Hunt Tribunal Shadow
Level Request Reward Base / TM
130+ 3x Tribunal Tooth Flower (Lv.160) in 5 min Flower of Revival 749,730 / 761,562
{{{Level_2}}} {{{Qt_2}}}x [[{{{Monster_2}}}]] (Lv.{{{LvM_2}}}) in {{{Time_2}}} {{{Reward_2}}} {{{Exp_2}}}
{{{Level_3}}} {{{Qt_3}}}x [[{{{Monster_3}}}]] (Lv.{{{LvM_3}}}) in {{{Time_3}}} {{{Reward_3}}} {{{Exp_3}}}
{{{Level_4}}} {{{Qt_4}}}x [[{{{Monster_4}}}]] (Lv.{{{LvM_4}}}) in {{{Time_4}}} {{{Reward_4}}} {{{Exp_4}}}
{{{Level_5}}} {{{Qt_5}}}x [[{{{Monster_5}}}]] (Lv.{{{LvM_5}}}) in {{{Time_5}}} {{{Reward_5}}} {{{Exp_5}}}
Found at:
Tribunal Tooth Flower is found at Room of Tribulation 6 (battlefield).
Tribunal Tooth Flower

Notes: {{{Notes}}}


Eternal Knight's Messenger - Hunt Tribunal Hell Knight


Eternal Knight's Messenger
Room of Tribulation 7
Image:Circle.gif
NPC: Eternal Knight's Messenger Location: Room of Tribulation 7
Quest Cycles: Each 1 Time(s) Condition: Have completed Golden Ant's Messenger - Hunt Tribunal Tooth Flower
Level Request Reward Base / TM
130+ 3x Tribunal Hell Knight (Lv.160) in 5 min None 749,730 / 761,562
{{{Level_2}}} {{{Qt_2}}}x [[{{{Monster_2}}}]] (Lv.{{{LvM_2}}}) in {{{Time_2}}} {{{Reward_2}}} {{{Exp_2}}}
{{{Level_3}}} {{{Qt_3}}}x [[{{{Monster_3}}}]] (Lv.{{{LvM_3}}}) in {{{Time_3}}} {{{Reward_3}}} {{{Exp_3}}}
{{{Level_4}}} {{{Qt_4}}}x [[{{{Monster_4}}}]] (Lv.{{{LvM_4}}}) in {{{Time_4}}} {{{Reward_4}}} {{{Exp_4}}}
{{{Level_5}}} {{{Qt_5}}}x [[{{{Monster_5}}}]] (Lv.{{{LvM_5}}}) in {{{Time_5}}} {{{Reward_5}}} {{{Exp_5}}}
Found at:
Tribunal Hell Knight is found at Room of Tribulation 7 (battlefield).
Tribunal Hell Knight

Notes: {{{Notes}}}


Silvanian's Messenger - Hunt Tribunal Yeti


Silvanian's Messenger
Room of Tribulation 8
Image:Circle.gif
NPC: Silvanian's Messenger Location: Room of Tribulation 8
Quest Cycles: Each 1 Time(s) Condition: Have completed Eternal Knight's Messenger - Hunt Tribunal Hell Knight
Level Request Reward Base / TM
130+ 3x Tribunal Yeti (Lv.160) in 5 min None 749,730 / 761,562
{{{Level_2}}} {{{Qt_2}}}x [[{{{Monster_2}}}]] (Lv.{{{LvM_2}}}) in {{{Time_2}}} {{{Reward_2}}} {{{Exp_2}}}
{{{Level_3}}} {{{Qt_3}}}x [[{{{Monster_3}}}]] (Lv.{{{LvM_3}}}) in {{{Time_3}}} {{{Reward_3}}} {{{Exp_3}}}
{{{Level_4}}} {{{Qt_4}}}x [[{{{Monster_4}}}]] (Lv.{{{LvM_4}}}) in {{{Time_4}}} {{{Reward_4}}} {{{Exp_4}}}
{{{Level_5}}} {{{Qt_5}}}x [[{{{Monster_5}}}]] (Lv.{{{LvM_5}}}) in {{{Time_5}}} {{{Reward_5}}} {{{Exp_5}}}
Found at:
Tribunal Yeti is found at Room of Tribulation 8 (battlefield).
Tribunal Yeti

Notes: {{{Notes}}}


King Enigmo's Messenger - Hunt Tribunal Koom


King Enigmo's Messenger
Room of Tribulation 9
Image:Circle.gif
NPC: King Enigmo's Messenger Location: Room of Tribulation 9
Quest Cycles: Each 1 Time(s) Condition: Have completed Silvanian's Messenger - Hunt Tribunal Yeti
Level Request Reward Base / TM
130+ 3x Tribunal Koom (Lv.170) in 5 min None 749,730 / 761,562
{{{Level_2}}} {{{Qt_2}}}x [[{{{Monster_2}}}]] (Lv.{{{LvM_2}}}) in {{{Time_2}}} {{{Reward_2}}} {{{Exp_2}}}
{{{Level_3}}} {{{Qt_3}}}x [[{{{Monster_3}}}]] (Lv.{{{LvM_3}}}) in {{{Time_3}}} {{{Reward_3}}} {{{Exp_3}}}
{{{Level_4}}} {{{Qt_4}}}x [[{{{Monster_4}}}]] (Lv.{{{LvM_4}}}) in {{{Time_4}}} {{{Reward_4}}} {{{Exp_4}}}
{{{Level_5}}} {{{Qt_5}}}x [[{{{Monster_5}}}]] (Lv.{{{LvM_5}}}) in {{{Time_5}}} {{{Reward_5}}} {{{Exp_5}}}
Found at:
Tribunal Koom is found at Room of Tribulation 9 (battlefield).
Tribunal Koom

Notes: {{{Notes}}}


Enigmo Van Peruoza's Messenger - Hunt Tribunal Merman Aku


Enigmo Van Peruoza's Messenger
Room of Tribulation 10
Image:Circle.gif
NPC: Enigmo Van Peruoza's Messenger Location: Room of Tribulation 10
Quest Cycles: Each 1 Time(s) Condition: Have completed King Enigmo's Messenger - Hunt Tribunal Koom
Level Request Reward Base / TM
130+ 3x Tribunal Merman Aku (Lv.170) in 5 min None 749,730 / 761,562
{{{Level_2}}} {{{Qt_2}}}x [[{{{Monster_2}}}]] (Lv.{{{LvM_2}}}) in {{{Time_2}}} {{{Reward_2}}} {{{Exp_2}}}
{{{Level_3}}} {{{Qt_3}}}x [[{{{Monster_3}}}]] (Lv.{{{LvM_3}}}) in {{{Time_3}}} {{{Reward_3}}} {{{Exp_3}}}
{{{Level_4}}} {{{Qt_4}}}x [[{{{Monster_4}}}]] (Lv.{{{LvM_4}}}) in {{{Time_4}}} {{{Reward_4}}} {{{Exp_4}}}
{{{Level_5}}} {{{Qt_5}}}x [[{{{Monster_5}}}]] (Lv.{{{LvM_5}}}) in {{{Time_5}}} {{{Reward_5}}} {{{Exp_5}}}
Found at:
Tribunal Merman Aku is found at Room of Tribulation 10 (battlefield).
Tribunal Merman Aku

Notes: {{{Notes}}}


Centakonus' Messenger - Hunt Tribunal Addax


Centakonus' Messenger
Room of Tribulation 11
Image:Circle.gif
NPC: Centakonus' Messenger Location: Room of Tribulation 11
Quest Cycles: Each 1 Time(s) Condition: Have completed Enigmo Van Peruoza's Messenger - Hunt Tribunal Merman Aku
Level Request Reward Base / TM
130+ 3x Tribunal Addax (Lv.170) in 5 min None 749,730 / 761,562
{{{Level_2}}} {{{Qt_2}}}x [[{{{Monster_2}}}]] (Lv.{{{LvM_2}}}) in {{{Time_2}}} {{{Reward_2}}} {{{Exp_2}}}
{{{Level_3}}} {{{Qt_3}}}x [[{{{Monster_3}}}]] (Lv.{{{LvM_3}}}) in {{{Time_3}}} {{{Reward_3}}} {{{Exp_3}}}
{{{Level_4}}} {{{Qt_4}}}x [[{{{Monster_4}}}]] (Lv.{{{LvM_4}}}) in {{{Time_4}}} {{{Reward_4}}} {{{Exp_4}}}
{{{Level_5}}} {{{Qt_5}}}x [[{{{Monster_5}}}]] (Lv.{{{LvM_5}}}) in {{{Time_5}}} {{{Reward_5}}} {{{Exp_5}}}
Found at:
Tribunal Addax is found at Room of Tribulation 11 (battlefield).
Tribunal Addax

Notes: {{{Notes}}}


Oddeye Dragon's Messenger - Hunt Tribunal Stoor Worm


Oddeye Dragon's Messenger
Room of Tribulation 12
Image:Circle.gif
NPC: Oddeye Dragon's Messenger Location: Room of Tribulation 12
Quest Cycles: Each 1 Time(s) Condition: Have completed Centakonus' Messenger - Hunt Tribunal Addax
Level Request Reward Base / TM
130+ 3x Tribunal Stoor Worm (Lv.170) in 5 min Flower of Revival 749,730 / 761,562
{{{Level_2}}} {{{Qt_2}}}x [[{{{Monster_2}}}]] (Lv.{{{LvM_2}}}) in {{{Time_2}}} {{{Reward_2}}} {{{Exp_2}}}
{{{Level_3}}} {{{Qt_3}}}x [[{{{Monster_3}}}]] (Lv.{{{LvM_3}}}) in {{{Time_3}}} {{{Reward_3}}} {{{Exp_3}}}
{{{Level_4}}} {{{Qt_4}}}x [[{{{Monster_4}}}]] (Lv.{{{LvM_4}}}) in {{{Time_4}}} {{{Reward_4}}} {{{Exp_4}}}
{{{Level_5}}} {{{Qt_5}}}x [[{{{Monster_5}}}]] (Lv.{{{LvM_5}}}) in {{{Time_5}}} {{{Reward_5}}} {{{Exp_5}}}
Found at:
Tribunal Stoor Worm is found at Room of Tribulation 12 (battlefield).
Tribunal Stoor Worm

Notes: {{{Notes}}}


Rosaspina's Messenger - Hunt Tribunal Madame Chiffon


Rosaspina's Messenger
Room of Tribulation 13
Image:Circle.gif
NPC: Rosaspina's Messenger Location: Room of Tribulation 13
Quest Cycles: Each 1 Time(s) Condition: Have completed Oddeye Dragon's Messenger - Hunt Tribunal Stoor Worm
Level Request Reward Base / TM
130+ 3x Tribunal Madame Chiffon (Lv.180) in 5 min None 749,730 / 761,562
{{{Level_2}}} {{{Qt_2}}}x [[{{{Monster_2}}}]] (Lv.{{{LvM_2}}}) in {{{Time_2}}} {{{Reward_2}}} {{{Exp_2}}}
{{{Level_3}}} {{{Qt_3}}}x [[{{{Monster_3}}}]] (Lv.{{{LvM_3}}}) in {{{Time_3}}} {{{Reward_3}}} {{{Exp_3}}}
{{{Level_4}}} {{{Qt_4}}}x [[{{{Monster_4}}}]] (Lv.{{{LvM_4}}}) in {{{Time_4}}} {{{Reward_4}}} {{{Exp_4}}}
{{{Level_5}}} {{{Qt_5}}}x [[{{{Monster_5}}}]] (Lv.{{{LvM_5}}}) in {{{Time_5}}} {{{Reward_5}}} {{{Exp_5}}}
Found at:
Tribunal Madame Chiffon is found at Room of Tribulation 13 (battlefield).
Tribunal Madame Chiffon

Notes: {{{Notes}}}


Amethysta's Messenger - Hunt Tribunal Freyja


Amethysta's Messenger
Room of Tribulation 14
Image:Circle.gif
NPC: Amethysta's Messenger Location: Room of Tribulation 14
Quest Cycles: Each 1 Time(s) Condition: Have completed Rosaspina's Messenger - Hunt Tribunal Madame Chiffon
Level Request Reward Base / TM
130+ 3x Tribunal Freyja (Lv.180) in 5 min None 749,730 / 761,562
{{{Level_2}}} {{{Qt_2}}}x [[{{{Monster_2}}}]] (Lv.{{{LvM_2}}}) in {{{Time_2}}} {{{Reward_2}}} {{{Exp_2}}}
{{{Level_3}}} {{{Qt_3}}}x [[{{{Monster_3}}}]] (Lv.{{{LvM_3}}}) in {{{Time_3}}} {{{Reward_3}}} {{{Exp_3}}}
{{{Level_4}}} {{{Qt_4}}}x [[{{{Monster_4}}}]] (Lv.{{{LvM_4}}}) in {{{Time_4}}} {{{Reward_4}}} {{{Exp_4}}}
{{{Level_5}}} {{{Qt_5}}}x [[{{{Monster_5}}}]] (Lv.{{{LvM_5}}}) in {{{Time_5}}} {{{Reward_5}}} {{{Exp_5}}}
Found at:
Tribunal Freyja is found at Room of Tribulation 14 (battlefield).
Tribunal Freyja

Notes: {{{Notes}}}


Delphinus' Messenger - Hunt Tribunal Fish Guardian Tink


Delphinus' Messenger
Room of Tribulation 15
Image:Circle.gif
NPC: Delphinus' Messenger Location: Room of Tribulation 15
Quest Cycles: Each 1 Time(s) Condition: Have completed Amethysta's Messenger - Hunt Tribunal Freyja
Level Request Reward Base / TM
130+ 3x Tribunal Fish Guardian Tink (Lv.180) in 5 min None 749,730 / 761,562
{{{Level_2}}} {{{Qt_2}}}x [[{{{Monster_2}}}]] (Lv.{{{LvM_2}}}) in {{{Time_2}}} {{{Reward_2}}} {{{Exp_2}}}
{{{Level_3}}} {{{Qt_3}}}x [[{{{Monster_3}}}]] (Lv.{{{LvM_3}}}) in {{{Time_3}}} {{{Reward_3}}} {{{Exp_3}}}
{{{Level_4}}} {{{Qt_4}}}x [[{{{Monster_4}}}]] (Lv.{{{LvM_4}}}) in {{{Time_4}}} {{{Reward_4}}} {{{Exp_4}}}
{{{Level_5}}} {{{Qt_5}}}x [[{{{Monster_5}}}]] (Lv.{{{LvM_5}}}) in {{{Time_5}}} {{{Reward_5}}} {{{Exp_5}}}
Found at:
Tribunal Fish Guardian Tink is found at Room of Tribulation 15 (battlefield).
Tribunal Fish Guardian Tink

Notes: {{{Notes}}}


Flashire Snake's Messenger - Hunt Tribunal Leviathan


Flashire Snake's Messenger
Room of Tribulation 16
Image:Circle.gif
NPC: Flashire Snake's Messenger Location: Room of Tribulation 16
Quest Cycles: Each 1 Time(s) Condition: Have completed Delphinus' Messenger - Hunt Tribunal Fish Guardian Tink
Level Request Reward Base / TM
130+ 3x Tribunal Leviathan (Lv.180) in 5 min Stone of Patience 749,730 / 761,562
{{{Level_2}}} {{{Qt_2}}}x [[{{{Monster_2}}}]] (Lv.{{{LvM_2}}}) in {{{Time_2}}} {{{Reward_2}}} {{{Exp_2}}}
{{{Level_3}}} {{{Qt_3}}}x [[{{{Monster_3}}}]] (Lv.{{{LvM_3}}}) in {{{Time_3}}} {{{Reward_3}}} {{{Exp_3}}}
{{{Level_4}}} {{{Qt_4}}}x [[{{{Monster_4}}}]] (Lv.{{{LvM_4}}}) in {{{Time_4}}} {{{Reward_4}}} {{{Exp_4}}}
{{{Level_5}}} {{{Qt_5}}}x [[{{{Monster_5}}}]] (Lv.{{{LvM_5}}}) in {{{Time_5}}} {{{Reward_5}}} {{{Exp_5}}}
Found at:
Tribunal Leviathan is found at Room of Tribulation 16 (battlefield).
Tribunal Leviathan

Notes: {{{Notes}}}


Usefull Things

Personal tools


ggFTW Games