Welcome to the LifeTO wiki archive! This is a mirror of the old ggFTW wiki, and much of the content is inaccurate for LifeTO. Please consider checking out the knowledgebase if you're just looking up info about items.

If you're coming from another server, consider giving us a try since you're here anyways :)
 

2007 Summer Event Part 2 - Summer Night Wish

From ggFTW Trickster Wiki

Jump to: navigation, search
Official Event Page: Summer Night Wish: Part 2
Period: Jul. 19 ~ Aug. 07, 2007

Contents

Total Base Experience: 31,752
Total TM Experience:
  • 35,855 (for Level 5~25)
  • 121,095 (for Level 26~55)
  • 2,386,655 (for Level 56~90)
  • 3,596,975 (for Level 91~120)
  • 4,615,271 (for Level 121+)
Prizes:
Items needed:


Pia - Remember Summer Night Wish: Part 1


Pia
Megalopolis Square
Image:Circle.gif
NPC: Pia Location: Megalopolis Square
Base Experience: None TM Experience: None
Request: Talk to her
Quest Cycles: 1 Time(s) Condition: Level 5+
Cycle 1: None
Cycle {{{Cycle_2}}}: {{{Reward_2}}}
Cycle {{{Cycle_3}}}: {{{Reward_3}}}
Cycle {{{Cycle_4}}}: {{{Reward_4}}}
Cycle {{{Cycle_5}}}: {{{Reward_5}}}
Cycle {{{Cycle_6}}}: {{{Reward_6}}}
Cycle {{{Cycle_7}}}: {{{Reward_7}}}
Cycle {{{Cycle_8}}}: {{{Reward_8}}}
Cycle {{{Cycle_9}}}: {{{Reward_9}}}
Cycle {{{Cycle_10}}}: {{{Reward_10}}}
Cycle {{{Cycle_11}}}: {{{Reward_11}}}
Cycle {{{Cycle_12}}}: {{{Reward_12}}}
Cycle {{{Cycle_13}}}: {{{Reward_13}}}
Cycle {{{Cycle_14}}}: {{{Reward_14}}}
Cycle {{{Cycle_15}}}: {{{Reward_15}}}
Cycle {{{Cycle_16}}}: {{{Reward_16}}}
Cycle {{{Cycle_17}}}: {{{Reward_17}}}
Cycle {{{Cycle_18}}}: {{{Reward_18}}}
Cycle {{{Cycle_19}}}: {{{Reward_19}}}
Cycle {{{Cycle_20}}}: {{{Reward_20}}}

Notes: Pia tells about the previous event and where start Part 2.


Pia - Transfer to Carbigal


Pia
Event Garden - Ceremonia
Image:Circle.gif
NPC: Pia Location: Event Garden - Ceremonia
Request: Lab Map (not consumed)
Condition: Level 5+
Transfer to: Swamp Town - Carbigal

Notes: Lab Map Lab Map is obtained by complete Dorothy - Thanks for Listening.


Blacksmith Marx - Marx is Lost


Blacksmith Marx
Swamp Town - Carbigal
Image:Circle.gif
NPC: Blacksmith Marx Location: Swamp Town - Carbigal
Quest Cycles: Each 8 Time(s) Condition: Level 5+
Level Request Reward TM
5~25 10x Angry Slithis (Lv.5) in 30 min 3x 500 Galder Coupon, Festival Goldfish 1,152
26~55 10x Angry Cobra Flower (Lv.26) in 30 min 3x 500 Galder Coupon, Festival Goldfish 11,807
56~90 10x Angry Tooth Flower (Lv.56) in 30 min 3x 500 Galder Coupon, Festival Goldfish 295,002
91~120 10x Angry Lotus Worm (Lv.91) in 30 min 3x 500 Galder Coupon, Festival Goldfish 446,292
121+ 10x Angry Stoor Worm (Lv.121) in 30 min 3x 500 Galder Coupon, Festival Goldfish 573,579
Found at:
Angry Slithis is found at Swamp Field 1 - Black Hole.

Angry Cobra Flower is found at Swamp Field 2 - Beaver's Swamp.

Angry Tooth Flower is found at Swamp Field 3 - Maze of Forest.

Angry Lotus Worm is found at Swamp Field 4 - Dark Omen.

Angry Stoor Worm is found at Swamp Field 5 - Further Maze of Forest.

Notes: {{{Notes}}}


Alchemist Nate - Guardian's Worry


Alchemist Nate
Gate of Black Swamp
Image:Circle.gif
NPC: Alchemist Nate Location: Gate of Black Swamp
Base Experience: 3,528 TM Experience: 2,573
Request: Blue Hair-Band, Walnut
Quest Cycles: 8 Time(s) Condition: Level 5+, have completed Blacksmith Marx - Marx is Lost (8 times)
Cycle 1: 4x 500 Galder Coupon or Festival Sword
Cycle 2: 4x 500 Galder Coupon, Alchemist Nate Card
Cycle 3: 4x 500 Galder Coupon, Dorothy Card
Cycle 4: 4x 500 Galder Coupon or Festival Shield
Cycle 5: 4x 500 Galder Coupon, Festival Shield
Cycle 6: 4x 500 Galder Coupon, Alchemist Nate Card
Cycle 7: 4x 500 Galder Coupon, Festival Sword
Cycle 8: 4x 500 Galder Coupon, Lab Key
Cycle {{{Cycle_9}}}: {{{Reward_9}}}
Cycle {{{Cycle_10}}}: {{{Reward_10}}}
Cycle {{{Cycle_11}}}: {{{Reward_11}}}
Cycle {{{Cycle_12}}}: {{{Reward_12}}}
Cycle {{{Cycle_13}}}: {{{Reward_13}}}
Cycle {{{Cycle_14}}}: {{{Reward_14}}}
Cycle {{{Cycle_15}}}: {{{Reward_15}}}
Cycle {{{Cycle_16}}}: {{{Reward_16}}}
Cycle {{{Cycle_17}}}: {{{Reward_17}}}
Cycle {{{Cycle_18}}}: {{{Reward_18}}}
Cycle {{{Cycle_19}}}: {{{Reward_19}}}
Cycle {{{Cycle_20}}}: {{{Reward_20}}}

Notes: Blue Hair-Band Blue Hair-Band and Walnut Walnut are drilled at Black Swamp Fields.


Pia - Transfer to Nate's Lab


Pia
Gate of Black Swamp
Image:Circle.gif
NPC: Pia Location: Gate of Black Swamp
Request: Lab Key (not consumed)
Condition: Level 5+
Transfer to: Nate's Lab

Notes: Lab Key Lab Key is obtained by complete Alchemist Nate - Guardian's Worry.


Dorothy - A Safe Place


Dorothy
Nate's Lab
Image:Circle.gif
NPC: Dorothy Location: Nate's Lab
Base Experience: 3,528 TM Experience: 2,573
Request: Talk to her
Quest Cycles: 1 Time(s) Condition: Level 5+, have completed Alchemist Nate - Guardian's Worry
Cycle 1: Festival Pass
Cycle {{{Cycle_2}}}: {{{Reward_2}}}
Cycle {{{Cycle_3}}}: {{{Reward_3}}}
Cycle {{{Cycle_4}}}: {{{Reward_4}}}
Cycle {{{Cycle_5}}}: {{{Reward_5}}}
Cycle {{{Cycle_6}}}: {{{Reward_6}}}
Cycle {{{Cycle_7}}}: {{{Reward_7}}}
Cycle {{{Cycle_8}}}: {{{Reward_8}}}
Cycle {{{Cycle_9}}}: {{{Reward_9}}}
Cycle {{{Cycle_10}}}: {{{Reward_10}}}
Cycle {{{Cycle_11}}}: {{{Reward_11}}}
Cycle {{{Cycle_12}}}: {{{Reward_12}}}
Cycle {{{Cycle_13}}}: {{{Reward_13}}}
Cycle {{{Cycle_14}}}: {{{Reward_14}}}
Cycle {{{Cycle_15}}}: {{{Reward_15}}}
Cycle {{{Cycle_16}}}: {{{Reward_16}}}
Cycle {{{Cycle_17}}}: {{{Reward_17}}}
Cycle {{{Cycle_18}}}: {{{Reward_18}}}
Cycle {{{Cycle_19}}}: {{{Reward_19}}}
Cycle {{{Cycle_20}}}: {{{Reward_20}}}

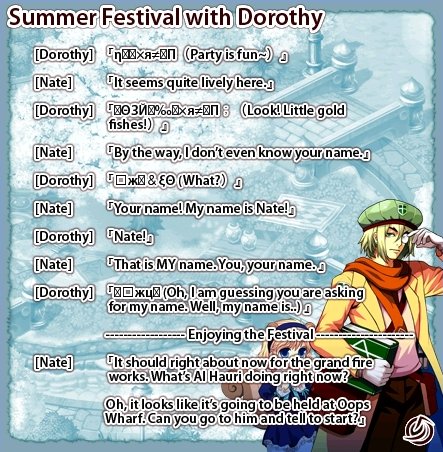
Notes: After complete this quest the image Summer Festival with Dorothy is showed up.


Al-Hauri - Transfer to Cherry Blossom


Al-Hauri
Swamp Town - Carbigal
Image:Circle.gif
NPC: Al-Hauri Location: Swamp Town - Carbigal
Request: Festival Pass (not consumed)
Condition: Level 5+
Transfer to: Cherry Blossom 1

Notes: Festival Pass Festival Pass is obtained by complete Dorothy - A Safe Place.


Alchemist Nate - Firework Just for Her


Alchemist Nate
Cherry Blossom 2
Image:Circle.gif
NPC: Alchemist Nate Location: Cherry Blossom 2
Base Experience: None TM Experience: 3,482
Request: 10x Black Gunpowder
Quest Cycles: 1 Time(s) Condition: Level 5+, have completed Dorothy - A Safe Place
Cycle 1: 3x 500 Galder Coupon, 2x Takoyaki, Festival Hat Ticket
Cycle {{{Cycle_2}}}: {{{Reward_2}}}
Cycle {{{Cycle_3}}}: {{{Reward_3}}}
Cycle {{{Cycle_4}}}: {{{Reward_4}}}
Cycle {{{Cycle_5}}}: {{{Reward_5}}}
Cycle {{{Cycle_6}}}: {{{Reward_6}}}
Cycle {{{Cycle_7}}}: {{{Reward_7}}}
Cycle {{{Cycle_8}}}: {{{Reward_8}}}
Cycle {{{Cycle_9}}}: {{{Reward_9}}}
Cycle {{{Cycle_10}}}: {{{Reward_10}}}
Cycle {{{Cycle_11}}}: {{{Reward_11}}}
Cycle {{{Cycle_12}}}: {{{Reward_12}}}
Cycle {{{Cycle_13}}}: {{{Reward_13}}}
Cycle {{{Cycle_14}}}: {{{Reward_14}}}
Cycle {{{Cycle_15}}}: {{{Reward_15}}}
Cycle {{{Cycle_16}}}: {{{Reward_16}}}
Cycle {{{Cycle_17}}}: {{{Reward_17}}}
Cycle {{{Cycle_18}}}: {{{Reward_18}}}
Cycle {{{Cycle_19}}}: {{{Reward_19}}}
Cycle {{{Cycle_20}}}: {{{Reward_20}}}

Notes: Black Gunpowder Black Gunpowder is drilled at Cherry Blossom 2 and dropped by Torpedo Fish (Lv.30). After complete this quest the image Dorothy's Heart is showed up.


Pia - Exchange


Pia
Cherry Blossom 2
Image:Circle.gif
NPC: Pia Location: Cherry Blossom 2
Item Fee Exchange for
Image:Festival Hat.gif
Festival Hat
0g Image:Festival Hat Ticket.gif x1
Festival Hat Ticket
Notes: Festival Hat Ticket are obtained by complete Alchemist Nate - Firework Just for Her.


Al-Hauri - Shop


Al-Hauri
Cherry Blossom 2
Image:Circle.gif
NPC: Al-Hauri
Location: Cherry Blossom 2
Use
Icon Name Cost
Takoyaki Takoyaki ?
[[Image:{{{4}}}.gif|{{{4}}}]] [[{{{5}}}]] {{{6}}}
[[Image:{{{7}}}.gif|{{{7}}}]] [[{{{8}}}]] {{{9}}}
[[Image:{{{10}}}.gif|{{{10}}}]] [[{{{11}}}]] {{{12}}}
[[Image:{{{13}}}.gif|{{{13}}}]] [[{{{14}}}]] {{{15}}}
[[Image:{{{16}}}.gif|{{{16}}}]] [[{{{17}}}]] {{{18}}}
[[Image:{{{19}}}.gif|{{{19}}}]] [[{{{20}}}]] {{{21}}}
[[Image:{{{22}}}.gif|{{{22}}}]] [[{{{23}}}]] {{{24}}}
[[Image:{{{25}}}.gif|{{{25}}}]] [[{{{26}}}]] {{{27}}}
[[Image:{{{28}}}.gif|{{{28}}}]] [[{{{29}}}]] {{{30}}}
[[Image:{{{31}}}.gif|{{{31}}}]] [[{{{32}}}]] {{{33}}}
[[Image:{{{34}}}.gif|{{{34}}}]] [[{{{35}}}]] {{{36}}}
[[Image:{{{37}}}.gif|{{{37}}}]] [[{{{38}}}]] {{{39}}}
[[Image:{{{40}}}.gif|{{{40}}}]] [[{{{41}}}]] {{{42}}}
[[Image:{{{43}}}.gif|{{{43}}}]] [[{{{44}}}]] {{{45}}}
[[Image:{{{46}}}.gif|{{{46}}}]] [[{{{47}}}]] {{{48}}}
[[Image:{{{49}}}.gif|{{{49}}}]] [[{{{50}}}]] {{{51}}}
[[Image:{{{52}}}.gif|{{{52}}}]] [[{{{53}}}]] {{{54}}}
[[Image:{{{55}}}.gif|{{{55}}}]] [[{{{56}}}]] {{{57}}}
[[Image:{{{58}}}.gif|{{{58}}}]] [[{{{59}}}]] {{{60}}}
[[Image:{{{61}}}.gif|{{{61}}}]] [[{{{62}}}]] {{{63}}}
[[Image:{{{64}}}.gif|{{{64}}}]] [[{{{65}}}]] {{{66}}}
[[Image:{{{67}}}.gif|{{{67}}}]] [[{{{68}}}]] {{{69}}}
[[Image:{{{70}}}.gif|{{{70}}}]] [[{{{71}}}]] {{{72}}}
[[Image:{{{73}}}.gif|{{{73}}}]] [[{{{74}}}]] {{{75}}}
[[Image:{{{76}}}.gif|{{{76}}}]] [[{{{77}}}]] {{{78}}}
[[Image:{{{79}}}.gif|{{{79}}}]] [[{{{80}}}]] {{{81}}}
[[Image:{{{82}}}.gif|{{{82}}}]] [[{{{83}}}]] {{{84}}}
[[Image:{{{85}}}.gif|{{{76}}}]] [[{{{86}}}]] {{{87}}}
[[Image:{{{88}}}.gif|{{{79}}}]] [[{{{89}}}]] {{{90}}}
[[Image:{{{91}}}.gif|{{{82}}}]] [[{{{92}}}]] {{{93}}}


Merchant Haru - Shop


Merchant Haru
Cherry Blossom 2
Image:Circle.gif
NPC: Merchant Haru
Location: Cherry Blossom 2
Use
Icon Name Cost
Pan Fried Noodle Yakisoba ?
[[Image:{{{4}}}.gif|{{{4}}}]] [[{{{5}}}]] {{{6}}}
[[Image:{{{7}}}.gif|{{{7}}}]] [[{{{8}}}]] {{{9}}}
[[Image:{{{10}}}.gif|{{{10}}}]] [[{{{11}}}]] {{{12}}}
[[Image:{{{13}}}.gif|{{{13}}}]] [[{{{14}}}]] {{{15}}}
[[Image:{{{16}}}.gif|{{{16}}}]] [[{{{17}}}]] {{{18}}}
[[Image:{{{19}}}.gif|{{{19}}}]] [[{{{20}}}]] {{{21}}}
[[Image:{{{22}}}.gif|{{{22}}}]] [[{{{23}}}]] {{{24}}}
[[Image:{{{25}}}.gif|{{{25}}}]] [[{{{26}}}]] {{{27}}}
[[Image:{{{28}}}.gif|{{{28}}}]] [[{{{29}}}]] {{{30}}}
[[Image:{{{31}}}.gif|{{{31}}}]] [[{{{32}}}]] {{{33}}}
[[Image:{{{34}}}.gif|{{{34}}}]] [[{{{35}}}]] {{{36}}}
[[Image:{{{37}}}.gif|{{{37}}}]] [[{{{38}}}]] {{{39}}}
[[Image:{{{40}}}.gif|{{{40}}}]] [[{{{41}}}]] {{{42}}}
[[Image:{{{43}}}.gif|{{{43}}}]] [[{{{44}}}]] {{{45}}}
[[Image:{{{46}}}.gif|{{{46}}}]] [[{{{47}}}]] {{{48}}}
[[Image:{{{49}}}.gif|{{{49}}}]] [[{{{50}}}]] {{{51}}}
[[Image:{{{52}}}.gif|{{{52}}}]] [[{{{53}}}]] {{{54}}}
[[Image:{{{55}}}.gif|{{{55}}}]] [[{{{56}}}]] {{{57}}}
[[Image:{{{58}}}.gif|{{{58}}}]] [[{{{59}}}]] {{{60}}}
[[Image:{{{61}}}.gif|{{{61}}}]] [[{{{62}}}]] {{{63}}}
[[Image:{{{64}}}.gif|{{{64}}}]] [[{{{65}}}]] {{{66}}}
[[Image:{{{67}}}.gif|{{{67}}}]] [[{{{68}}}]] {{{69}}}
[[Image:{{{70}}}.gif|{{{70}}}]] [[{{{71}}}]] {{{72}}}
[[Image:{{{73}}}.gif|{{{73}}}]] [[{{{74}}}]] {{{75}}}
[[Image:{{{76}}}.gif|{{{76}}}]] [[{{{77}}}]] {{{78}}}
[[Image:{{{79}}}.gif|{{{79}}}]] [[{{{80}}}]] {{{81}}}
[[Image:{{{82}}}.gif|{{{82}}}]] [[{{{83}}}]] {{{84}}}
[[Image:{{{85}}}.gif|{{{76}}}]] [[{{{86}}}]] {{{87}}}
[[Image:{{{88}}}.gif|{{{79}}}]] [[{{{89}}}]] {{{90}}}
[[Image:{{{91}}}.gif|{{{82}}}]] [[{{{92}}}]] {{{93}}}


Merchant Lorena - Shop


Merchant Lorena
Cherry Blossom 2
Image:Circle.gif
NPC: Merchant Lorena
Location: Cherry Blossom 2
Use
Icon Name Cost
Candied Apple Lingoame ?
[[Image:{{{4}}}.gif|{{{4}}}]] [[{{{5}}}]] {{{6}}}
[[Image:{{{7}}}.gif|{{{7}}}]] [[{{{8}}}]] {{{9}}}
[[Image:{{{10}}}.gif|{{{10}}}]] [[{{{11}}}]] {{{12}}}
[[Image:{{{13}}}.gif|{{{13}}}]] [[{{{14}}}]] {{{15}}}
[[Image:{{{16}}}.gif|{{{16}}}]] [[{{{17}}}]] {{{18}}}
[[Image:{{{19}}}.gif|{{{19}}}]] [[{{{20}}}]] {{{21}}}
[[Image:{{{22}}}.gif|{{{22}}}]] [[{{{23}}}]] {{{24}}}
[[Image:{{{25}}}.gif|{{{25}}}]] [[{{{26}}}]] {{{27}}}
[[Image:{{{28}}}.gif|{{{28}}}]] [[{{{29}}}]] {{{30}}}
[[Image:{{{31}}}.gif|{{{31}}}]] [[{{{32}}}]] {{{33}}}
[[Image:{{{34}}}.gif|{{{34}}}]] [[{{{35}}}]] {{{36}}}
[[Image:{{{37}}}.gif|{{{37}}}]] [[{{{38}}}]] {{{39}}}
[[Image:{{{40}}}.gif|{{{40}}}]] [[{{{41}}}]] {{{42}}}
[[Image:{{{43}}}.gif|{{{43}}}]] [[{{{44}}}]] {{{45}}}
[[Image:{{{46}}}.gif|{{{46}}}]] [[{{{47}}}]] {{{48}}}
[[Image:{{{49}}}.gif|{{{49}}}]] [[{{{50}}}]] {{{51}}}
[[Image:{{{52}}}.gif|{{{52}}}]] [[{{{53}}}]] {{{54}}}
[[Image:{{{55}}}.gif|{{{55}}}]] [[{{{56}}}]] {{{57}}}
[[Image:{{{58}}}.gif|{{{58}}}]] [[{{{59}}}]] {{{60}}}
[[Image:{{{61}}}.gif|{{{61}}}]] [[{{{62}}}]] {{{63}}}
[[Image:{{{64}}}.gif|{{{64}}}]] [[{{{65}}}]] {{{66}}}
[[Image:{{{67}}}.gif|{{{67}}}]] [[{{{68}}}]] {{{69}}}
[[Image:{{{70}}}.gif|{{{70}}}]] [[{{{71}}}]] {{{72}}}
[[Image:{{{73}}}.gif|{{{73}}}]] [[{{{74}}}]] {{{75}}}
[[Image:{{{76}}}.gif|{{{76}}}]] [[{{{77}}}]] {{{78}}}
[[Image:{{{79}}}.gif|{{{79}}}]] [[{{{80}}}]] {{{81}}}
[[Image:{{{82}}}.gif|{{{82}}}]] [[{{{83}}}]] {{{84}}}
[[Image:{{{85}}}.gif|{{{76}}}]] [[{{{86}}}]] {{{87}}}
[[Image:{{{88}}}.gif|{{{79}}}]] [[{{{89}}}]] {{{90}}}
[[Image:{{{91}}}.gif|{{{82}}}]] [[{{{92}}}]] {{{93}}}


Eliza Bath - Shop


Eliza Bath
Cherry Blossom 2
Image:Circle.gif
NPC: Eliza Bath
Location: Cherry Blossom 2
Use
Icon Name Cost
Sweet Dango Dumpling ?
[[Image:{{{4}}}.gif|{{{4}}}]] [[{{{5}}}]] {{{6}}}
[[Image:{{{7}}}.gif|{{{7}}}]] [[{{{8}}}]] {{{9}}}
[[Image:{{{10}}}.gif|{{{10}}}]] [[{{{11}}}]] {{{12}}}
[[Image:{{{13}}}.gif|{{{13}}}]] [[{{{14}}}]] {{{15}}}
[[Image:{{{16}}}.gif|{{{16}}}]] [[{{{17}}}]] {{{18}}}
[[Image:{{{19}}}.gif|{{{19}}}]] [[{{{20}}}]] {{{21}}}
[[Image:{{{22}}}.gif|{{{22}}}]] [[{{{23}}}]] {{{24}}}
[[Image:{{{25}}}.gif|{{{25}}}]] [[{{{26}}}]] {{{27}}}
[[Image:{{{28}}}.gif|{{{28}}}]] [[{{{29}}}]] {{{30}}}
[[Image:{{{31}}}.gif|{{{31}}}]] [[{{{32}}}]] {{{33}}}
[[Image:{{{34}}}.gif|{{{34}}}]] [[{{{35}}}]] {{{36}}}
[[Image:{{{37}}}.gif|{{{37}}}]] [[{{{38}}}]] {{{39}}}
[[Image:{{{40}}}.gif|{{{40}}}]] [[{{{41}}}]] {{{42}}}
[[Image:{{{43}}}.gif|{{{43}}}]] [[{{{44}}}]] {{{45}}}
[[Image:{{{46}}}.gif|{{{46}}}]] [[{{{47}}}]] {{{48}}}
[[Image:{{{49}}}.gif|{{{49}}}]] [[{{{50}}}]] {{{51}}}
[[Image:{{{52}}}.gif|{{{52}}}]] [[{{{53}}}]] {{{54}}}
[[Image:{{{55}}}.gif|{{{55}}}]] [[{{{56}}}]] {{{57}}}
[[Image:{{{58}}}.gif|{{{58}}}]] [[{{{59}}}]] {{{60}}}
[[Image:{{{61}}}.gif|{{{61}}}]] [[{{{62}}}]] {{{63}}}
[[Image:{{{64}}}.gif|{{{64}}}]] [[{{{65}}}]] {{{66}}}
[[Image:{{{67}}}.gif|{{{67}}}]] [[{{{68}}}]] {{{69}}}
[[Image:{{{70}}}.gif|{{{70}}}]] [[{{{71}}}]] {{{72}}}
[[Image:{{{73}}}.gif|{{{73}}}]] [[{{{74}}}]] {{{75}}}
[[Image:{{{76}}}.gif|{{{76}}}]] [[{{{77}}}]] {{{78}}}
[[Image:{{{79}}}.gif|{{{79}}}]] [[{{{80}}}]] {{{81}}}
[[Image:{{{82}}}.gif|{{{82}}}]] [[{{{83}}}]] {{{84}}}
[[Image:{{{85}}}.gif|{{{76}}}]] [[{{{86}}}]] {{{87}}}
[[Image:{{{88}}}.gif|{{{79}}}]] [[{{{89}}}]] {{{90}}}
[[Image:{{{91}}}.gif|{{{82}}}]] [[{{{92}}}]] {{{93}}}


Event Monsters
Angry Slithis Angry Cobra Flower Angry Tooth Flower Angry Lotus Worm Angry Stoor Worm
Lv.5 Lv.26 Lv.56 Lv.91 Lv.121
Found at
Swamp Field 1 - Black Hole Swamp Field 2 - Beaver's Swamp Swamp Field 3 - Maze of Forest Swamp Field 4 - Dark Omen Swamp Field 5 - Further Maze of Forest


ggFTW Games